
Seed Sowing with Soil Blocks
We're trying something new this month, but just about everything we're doing is new to us with respect to flower farming, so you're getting a very honest first impression here!
Last fall I saw quite a few posts about seed sowing with soil blocks, and then I came across this video from Johnny's Selected Seeds. It explains everything so clearly- and of course all the supplies are available in their online shop.
However, there are plenty of ways to life hack your way to low cost seed blockers made from stuff lying around at home, too.
I found even more resources from Bare Mountain Farm. These links pretty much sold me on soil blocking and got me hooked on a host of video resources.
If you don't check in regularly with Bare Mountain Farm and you are interested in Flower Farming, well-- you might want to. Be sure to take a spin through their YouTube channel before your next project. They may have already solved some problems for you or discovered an easier way to get you where you're trying go!
When it comes to soil blocking, here is what I've learned.
And remember-- you have to take this from my rookie point of view. But, if you're just starting out, hopefully you might avoid some of the mistakes I made and benefit from the discoveries I came across.

A mini soil blocking tool from Johnny's Selected Seeds
Materials needed for soil blocking
Materials to start with:
A good soil blocking mix. Johnny's 512 mix is perfect for the job. I order it 60 quarts at a time. You should have seen the look on the school postal worker's face when I told him I was expecting boxes of dirt to come in the mail. Some day, I hope to order it by the truckload, but for now our small farm will make do this way.
Seed blocking tools. We also got them from Johnny's.
Some kind of low bin for mixing soil with water and loading it into the blockers.
Flat or nearly flat trays to put your blocks on for germination.
Water
Seeds!
A petri dish or hand seed-sower
A pair of angle tip tweezers or forceps, like these. The mini blocks fit perfectly in them and they make it a lot easier to move or transplant the small blocks into larger ones. (This discovery made possible by the fact that our greenhouse is attached to a biology classroom!)
I also like to have a flat paint scraping tool from the hardware store on hand. It works great for lifting blocks and moving them to other places. A spatula might work just as well.
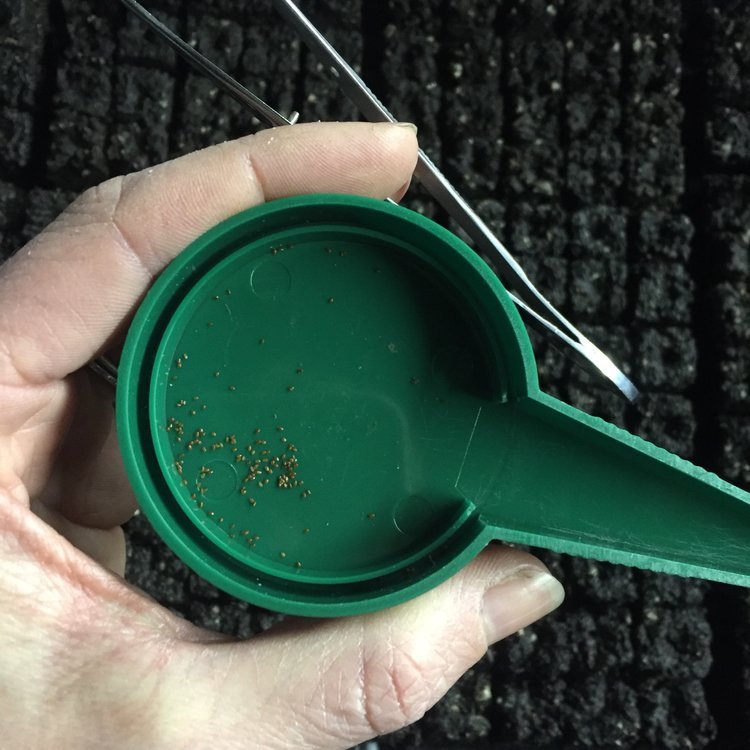
Hand seed-sower with campanula seeds and a pair of angled forceps. For tiny seeds like campanula, poppies, and snapdragons I dip one prong of the forceps in water and use the water to latch on to the seed and transfer it to the moist block.
soil blocking procedure
Process:
Put some dry soil mix in your mixing bin and add water slowly while you mix things together with your hands until it has the consistency of chunky peanut butter.
For me, it wasn't enough to press my soil blocker into the mix as I've seen in others' videos. I also need to press my thumb into the little cups and then add a bit more soil until they were more compact. Otherwise, I found that the blocks would just fall apart when I "plunged them."
Next, put your full soil blocker on to the tray and gently push the plunger down as you lift up the tool. You'll have to take a few practice runs, but it won't be long before you get the hang of it!

I'm starting successions of 25 Haremstraum poppies at a time. If you look closely you can see some early sprouts here.
The upside of soil blocking
The upsides:
First- soil blocking is really satisfying. That might not be the way you hoped I'd start this section, but there you have it. For me, there was no joy in stuffing damp soil into little plastic trays- in fact that seemed more annoying last year than anything. Soil blocking is satisfying in the same way that lifting off a sandcastle mold to find a perfect little structure underneath is satisfying. I'm getting all warm thinking about it right now.
Next- I'm saving a ton of room in the greenhouse. We are borrowing space in a school greenhouse to get our seeds started, and the last thing I wanted to do was overwhelm the space and wear out my welcome. In a standard 1020 (10"x20") tray I can fit- wait for it- 300 mini blocks. A mini block is a 3/4 inch soil cube with a small dimple to hold a seed(s). The mini block tool from Johnny's makes 20 blocks at time.
Third- the soil blocking system is saving me from having to buy tons of plastic cell packs. And, because the system allows you to "size up" to 2" blocks and then bigger when you're ready, you can germinate on the small scale and move up only the seeds that "take" when they're ready. I won't have to wash out all those cells later, either. I know I'm going to appreciate that when spring comes and I start planting out!
Fourth- Soil blocks prevent plants from wasting energy and becoming root bound. Have you ever pulled a young plant out of a cell pack and seen how the roots were running round and round? Believing they are underground (there is no light or air) roots from plants that are in plastic pots will grow and grow and grow in search of space. Because there is a barrier of air around each soil block, the roots will actually slow down when they reach the edge of the cube and wait until they are planted up into a larger block to grow more.
Below: My son helps me move some sprouts in mini blocks up to 2" soil blocks.
The things I still need to figure out:
No system is perfect, but I feel this one will be pretty close once I get a better handle on it. One thing I'm still trying to figure out is how to keep my mini blocks perfectly moist. I think it has to do with the trays I'm using. Pay close attention to the recommendation from Bare Mountain here. The trays in this video are more expensive than 1020's in bulk, but maybe they're worth it if you can afford them. It sounds like they allow for the proper amount of water to be absorbed from below. I need to get a handle on watering my blocks a little better, too. If you water them too much, they start to dissolve. I spend some good time misting mine with a spray bottle, pouring water between the rows, and covering them with clear plastic 1020 domes.
A second improvement I want to make is to move to a more level surface for my soil blocks to rest on. The woven trays above would help, but so might cafeteria trays or even sheets of plywood. I've seen other farmers use both of those methods. Time to talk to my friends in the school's kitchen!
So- what have we got going in soil blocks now? There are two successions of a Haremstraum Poppy mix (just starting to sprout) from one of my favorite companies- Swallowtail Garden Seeds, Sea Holly, Globe Flower, Campanula, Columbine, Delphinium, and Lupine. These are all perennial flowers. I'm hoping that by starting them early, I might be able to get some blooms this season. If you want something that will start fast-- the Globe Flower is amazing. Mine germinated in 3 days! Next time, I'll start them in 2" blocks, because I had to move them up so quickly. I'm trying to keep the greenhouse temps. between 60°F and 70°F, as best I can-- but it swings below and above that range for an hour or two here and there. Our Lupine trial is going well. Take a peek to learn more about our recommendations for starting these popular flowers from seed. Once you get them going, they should re-seed easily and come back year after year in climates that have cold winters.
I hope this article was helpful. Please share your comments and ideas for future posts. I've relied heavily on information from my flower farming friends online, and I hope these perspectives might come in handy, too.


Join our Community of Growers!
We have lots more to share! Learn more about the Pro Platform- where we share weekly behind the scenes video tips about our favorite plants, efficient processes, and must-have tools. Members have access to the full library, plus downloads and templates, our vendor lists, special offers, and a tool gallery.