
flower wall construction and installation
Last week I built and installed a 9ft wide by 8ft tall floral “wall” for a client at a wedding venue. This was my first floral wall build, but I felt confident about taking on the job because I planned to use the same no-floral-foam techniques I employed for the large triangle-shaped sign installation earlier in the summer.
I built the wall in three sections, and all construction was done on our front porch and (gulp) in the foyer of our farmhouse in the rainy days leading up to the event. We don’t have a barn or garage yet, so I have to use the space we have for now! I try to work on these projects when my family is out of the house, because they are messy and a bit loud. The basic construction consists of building wood frame panels that are enclosed in chicken wire with a natural material “filling.” The filling serves two purposes. It takes up space in your work so that you can use fewer flowers and greens later. It also helps to hold the materials you’ll be sticking in later.
The tools and materials for the 9ft wide by 8ft tall floral wall include the following:
7 boards of 8ft long 4in x 1in (4 by 1) pine
3 boards of 12ft long 4in x 1in (4 by 1) pine (or 6, 6ft lengths). You can also have your lumber yard cut the 12ft boards down into 3ft lengths for easy transport home and fewer cuts at home
2 rolls, 36in by 24ft green plastic coated chicken wire
Staple gun and 5/8 inch staples
Chop saw
Pair of pliers
Hammer
Optional pint can (small can) of wood stain and wide paint brush (I will be staining mine soon. The rain prevented staining before the event)
Vines, branches, or other natural materials that will dry and not rot for filling the inside of the wall
1 roll 2.5ft x about 35ft brown craft paper (if you can find wider paper, you can get away with a shorter length. The paper is for covering the back of the wall, so that no light filters through
U-Glue glue glue tape squares for attaching the paper to the back of the structure
Zip ties - I usually keep a variety of sizes and lengths in our wedding kit. For this project I used 8, 10in clear plastic ties
2 heavy duty (NOT light duty) 6ft T-posts
Manual fence post driver
Clean, level floor workspace (I used our front porch. The lines from the decking helped me build my frames square.)
To begin, cut the 12ft/6ft boards into 3ft lengths. Set out 2 of the 3 footers. We’re going to build the first of 3 wall sections.
Then, set out 2 of the 8ft boards on their edges and add 3ft sections to the top and bottom. There should be 4 inches of depth to the wall, if that makes sense. Make sure that the total outside width of the project is 3ft so that the chicken wire will fit across the frame on the front and back sides.
Tack those four boards together with the staple gun. Hammer in any staples that didn’t go completely in. I use about 4 staples per joint. Don’t worry if you have a “mis-fire.” Remove any junky staples with your pliers and discard them.
Turn the frame over and staple the joints from the other side. Repeat this same process for two more frames if you’d like to have a 9ft-wide wall.
Next, take the extra 8ft board and cut it down into 4 corner support pieces per frame. You’ll have to adjust your chop saw to a 45 degree angle. My corner supports are each about 8 inches long. Make sure that you are angle your cuts so that they fit into place properly as in the diagram below.
Staple all the corner pieces into place with 3 or 4 staples each from both sides of the frame.
Next, take 2, 3ft pieces for each frame. Cut them down (about an inch and a half) so that they fit into your frames as cross bracing. I spaced mine every 32 inches, so that my final wall would be made up of 9 boxes of the same size. The cross bracing adds support and it prevents all the natural material from sinking to the bottom of the wall. This detail will also help you with estimating the amount of flowers you need to complete jobs. (Fill one box. Time how long it takes you and see how many flowers/greens it takes. Multiply by the number of boxes remaining) This is how your frames should look now:

Flower wall construction diagram. Built with standard 1x4inch pine boards.
Now, your frames should be feeling a bit more solid, but you’re probably still wondering if they can actually hold up to the task. Don’t worry! When you add the chicken wire screens on each side and tack them down nice and tight, the frames will become much stronger. Staple the chicken wire down on one side (only) of the frame every 5 inches or so. Staple it also to the cross bracing. Hammer down your staples to make sure they are secure.

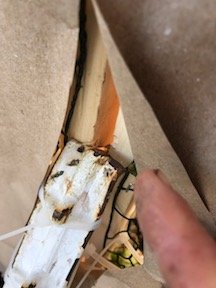
Close up of chicken wire, natural material “filling” and corner bracing pieces
Next, turn the frame over so that the screened side is down. Fill the 3 frame boxes with lots of sticks, vines, and branches/grasses that will take up space and dry out, but not rot over time. The natural materials will help grab and hold on to the flowers you stick into the wall later. And they will help take up space and block light from filtering through if you decide to make double-sided wall designs.
Screen the second side of the frame with the chicken wire and staple the screen down like you did on the first side.
That’s it for the wall prep. You’re ready to add whatever materials you like. Water-tube wilt prone flowers or wrap the stems with a damp material and plastic bags. Just stick everything into the chicken wire until you feel “grab.” The wall is pretty light-weight before it is filled. I’m 5’3” and I can move the sections around our property and in and out of storage in the basement pretty easily.
I recommend adding flowers and greens to at least part of the wall at your studio before you move it to the venue so that you can estimate how much time it will take to complete the process. Again— this is where having the wall panels divided into smaller sections really helps.
To install the wall, I put all three sections on edge in my delivery van and set up the wall before filling it completely.
If you are placing the wall on a stage and the stage abuts the edge of the tent wall, you can expect to take up the rear two feet of the stage in order for the wall to fit under the slope of the tent roof. If the wall is sitting right on the grass/ground it will pretty perfectly fill one tent wall panel area (at the least this is true for the kinds of tents people seem to be using up here).
We wanted my wall to be on the stage, so we had to figure out how to anchor it without making those anchors obvious or messy. I drove (with a post driver) a 6-ft heavy duty T-post into the ground just outside the tent at a sharp angle. The large ridge running the length of the post should be angled straight down so that it fits right between two wall panels. Zip tie one wall panel to the T-post. Next, zip tie the two neighboring wall panels together and zip tie them both to the T-post. This is what it looked like (Images captured during take-down. Please ignore my farmer hands!):

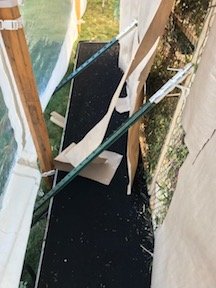
Add a few more zip ties at varying heights to the connect the two wall panels to each other and hold them flush. Tighten the zip ties on the T-post. Repeat the process to add the third wall. I used only 2 heavy duty T-posts, one at each of the two wall panel seams. I considered adding more, but after testing the strength of the wall, I knew it wasn’t going anywhere. If you are installing a wall outside and it may be windy, you’ll want to add more angled posts and maybe some posts that are straight up and down against the wall. Hide them with foliage and flowers.
If you are building a one-sided design like mine, cover the other side of the wall with a material to block the light from filtering through and showing the gaps. I used a roll of 2.5ft wide heavy duty brown craft paper from a hardware store and I cut and wrapped the paper right around the T-posts. Secure the craft paper to the wall frames and with glue dots.
Finish filling the wall from the front and VOILA!
This is a long post. It might seem complicated. I promise it isn’t. I made and installed this wall by myself over the course of a few days whilst preparing the other wedding flower items. I apologize if I’ve been wordy or confusing here. Please let me know if you need clarification on anything. I tried to be thorough, but I’m sure I missed some things. Thank you for following along.
Best,
