
Starting Lupine Seeds
When we first looked into starting lupine seeds early, we found many different suggestions online. Some folks pointed toward chilling them, some toward soaking them, some said to scratch the seed coat with sand paper, others suggested using a nail clipper.
What I really wanted was for someone to just point me in a singular right direction. Was there one method or combination of methods that just worked better? There had to be, but I couldn't easily find any measurable data.
So, I began our first trial in earnest. I picked lupine for a couple reasons.
1. I had saved some of my own seeds, so I didn't feel like I might be "wasting" seeds I'd spent money on. And- I had a lot of them- so I had a large sample size (hundreds of seeds) to test different techniques on.
2. I also had some lupine seeds that I'd purchased. I wanted to know the difference between the specialty seeds and my own. Would my own seeds hold up to the ones I bought?
To start, I listed all of the suggestions I'd found online for starting lupine. Most suggested some kind of scarification, or the chipping off of a part of the seed coat (often with nail clippers). But, as a beginning flower farmer, I had no idea what that meant or how to do it. Others suggested chilling the seeds or soaking them for 24 hours before sowing them.
So I tried all of these things and more and tried them in different combinations. I also froze some seeds, because some people suggest that perennials do best when they have experienced a temperature/climate dormancy period similar to nature.
The most successful way to germinate lupine seeds
What I found was that there is really only one way I'd recommend preparing lupine seeds for sowing during the pre-season. My most successful combination of techniques (by far-- like 100% germination far) involved scarification with a small, serrated knife, followed by 10 days between damp paper towels in the refrigerator.
Chipping off a portion of a seed coat with a knife might sound dangerous- and maybe it was, but I came away unscathed.
What I noticed was that the seeds that were "aggressively" chipped did best.
Here is what mine looked like after chipping, but before chilling. The ones on the left were some of the "aggressively" chipped ones. The ones are the right are un-chipped.

Lupine seeds: pre-chipped on the left and un-chipped on the right
I was initially worried that in exposing part of the vulnerable insides of the seeds I'd ruin them. But, what really seemed to happen was that in opening a "doorway" to the seed, I allowed water to get in. The seeds swelled and all of them had sprouted by the time I checked on them 10 days later.

10-day lupine germination photo
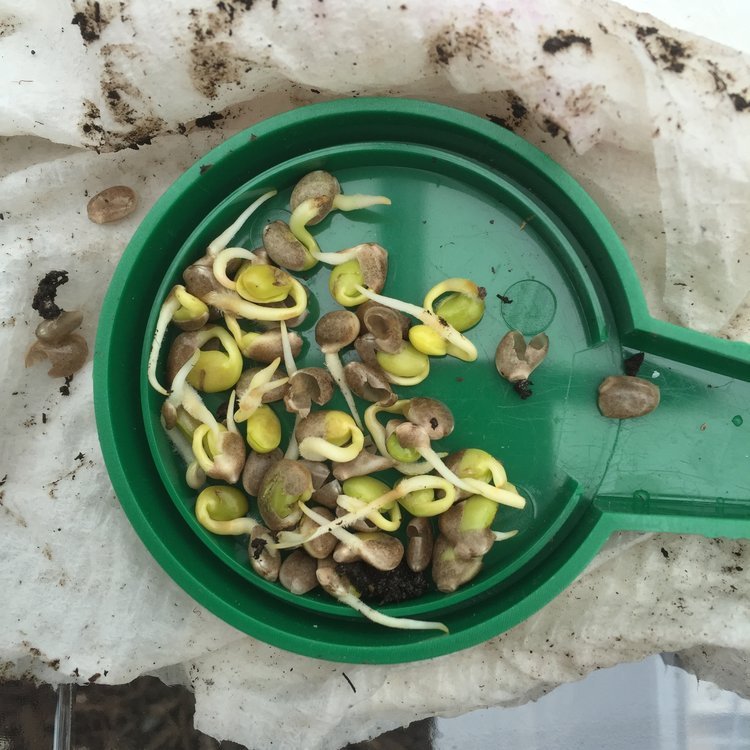
Lupine sprouts: chipped and put in the fridge between damp paper towels for 14 days.
I forgot this batch in the fridge - some of them had already shed their seed coats by day 14. They planted out fine into soil blocks.

Lupine sprouts on day 20.
All said, I'm pleased with the outcomes. Lupine have a tough seed coat for surviving difficult winters, but that can make them hard to sow with good results in the greenhouse. The seed packets said to expect 14-28 days for germination, so I was happily surprised to see ours sprout in less than 10 days.
Because lupine appreciate cooler temps, I'm keeping them closer to the floor in the greenhouse (between 50°F and 65°F), and I make sure they are uncovered during the day so they don't dampen off.
Our new challenge with these plants is to keep them going until spring. With the January 1 start day, they will be the "oldest" plants from seed for the upcoming season. We'll have to see how many make it into the ground on the farm.
Thanks for following the Barn Bulletin. Please share a comment if you have a question or let us know if there is a particular topic you'd like us to write about in the future. Have your own favorite way to start lupine? Let us know what works for you!


Love this post?
We have lots more to share! Learn more about the Pro Platform- where we share weekly behind the scenes video tips about our favorite plants, efficient processes, and must-have tools. Members have access to the full library, plus downloads and templates, Instagram Live sessions on topics of their choosing, our vendor lists, special offers, and a tool gallery.
