
Propagating Dahlias from Cuttings: Part 1
Thank you to all of you who reached out to me via email and social media about the lupine seed starting post. I was really overwhelmed (in a good way!) to learn that you found it useful. This month's experiment has to do with propagating dahlias from cuttings.
As a flower farming newbie, I'm trying to grow my collection of flowers at the lowest cost possible.
We are "lean farming" wherever we can! That's why I'm investing in growing some perennials from seed and that's why I'm trying to figure out how to start my dahlias early and take cuttings from them that will multiply my stock on the front end of the season.
I wish I could tell you which kinds of dahlias I have here, but to be completely transparent, I have to tell you that I really have no idea which is which. I marked mine with sharpie markers, but it didn't hold up. I need to find a different way. Ironically, the only label that survived the winter is one that reads, "Mystery" because it hadn't come into bloom before our first hard frost!
I found instructions at Dave's Dahlia Diary for taking cuttings from dahlia tubers. Dave also lays out a timeline with things to work on each month from January to summer. It seems really helpful-- and it is definitely guiding my method here.
From here on out, I'm going to write this post in segments, so I don't forget to share something. Here goes another experiment...
January 25: Tonight, I pulled out my tubers from last season. I had a small collection of dahlias- a few that I bought from another flower farmer, some from a garden center, and one that I received from a friend as a gift. I kept my tubers (after cleaning and separating them in October) in a clear plastic tub with pine shavings (I don't think it is wise to keep them in an airtight container, but I was pretty sure mice would get to them otherwise in our old farmhouse.
I used the pine shavings to absorb any moisture that might cause mold- it worked pretty well.
They were stored under an eve in a window-seat type storage area).
From my initial collection, I have 22 tubers that I *think* may take (yes-- it is a small collection!). I prepped two 1020 trays with some older potting soil and some new, richer compost/seed starting mix from Johnny's Selected Seeds. Each tray has a slotted liner- more for letting moisture out if I need to, than for bottom watering. I plan to water them from the top and only now and again so they don't dry out. I put about half of my tubers in one tray, with their "eyes" sticking out of the soil. My tubers are grouped by quality-- the ones I think have a good chance of sending up shoots... and the ones that might not. I'm hoping this decision will also curb the spread of disease from the weaker-looking tubers to the stronger ones.
I put clear plastic domes over them before I left tonight- it can get really dry here with the warm air from the heater circulating around the plants. I'll probably take the domes off during the day. According to Dave's article, I should be able to take cuttings from these tubers each month from February until I plant them out after the last frost.
January 30: Just five days later I noticed some growth at a tuber eye that hadn't been there on the 25th. In that time, I had tried to make sure that the soil in the tray was not soaking wet, but that some moisture was visible (loose soil on the top dries up, but I can see that the tubers are getting some water below because the rest of the soil looks and feels damp.)
February 5: I checked on my tubers this morning. In the first days of this trial I saw a little growth more growth at the same tuber eye. A few of the other tubers have also begun to show tiny sprouts.

Tuber with multiple eyes (four, I think) showing growth on February 5 (10 days into the trial). I added more soil after the photo to cover the exposed tuber, but not the crown.
February 13: I went to check in on the greenhouse today (Monday) after having not looked in on the plants on Saturday and Sunday. I was surprised to see that two of the tubers have taken off! --So much so that I'm wondering if maybe they don't want me peeking in on them as much as I do! The trays looked pretty dry and some of the soil had slipped off the top of a few tubers. I added more soil to cover them, but not their crowns, and I poured a couple of cups of water over each tray. The domes went back on for the night to protect everything from just drying right back up.

Dahlia sprouts on day 19. I added soil to this tray after the photo was taken so that the tuber would be covered up. The drying soil seemed to have crumbled and fallen off of it.

More sprouts on day 19.
February 23: It's been ten days since my last entry and while things were quiet here on the blog, they weren't without a bit of drama in our home. I tied up work in the greenhouse as best I could last Friday morning. I watered everything well. I set the heater and exhaust fans to the proper settings and left town for a few days expecting everything to continue on as it had. Well, that didn't happen. The sun decided to come out in full force in Lake Placid, and the school greenhouse fan system was overwhelmed. The temperatures spiked and my plants were cooking near 100 degree F for a couple of hours while I scrambled to find help from afar. (I could tell there was a problem because of our Lacrosse Alerts remote reporting monitor.) Thankfully, a good friend came to the rescue and then managed the greenhouse temps until I came back a few days later. Some of the plants seemed traumatized, but the heat-loving dahlias took off. Now, one tuber has three shoots that are ready for cutting propagation. It has been really interesting to watch how these tubers start. Some threw up shoots in just a few days- others are just slowly starting to grow from the eyes. I think there may well be a month or more between the first shoots that are ready and on some tubers verses others.
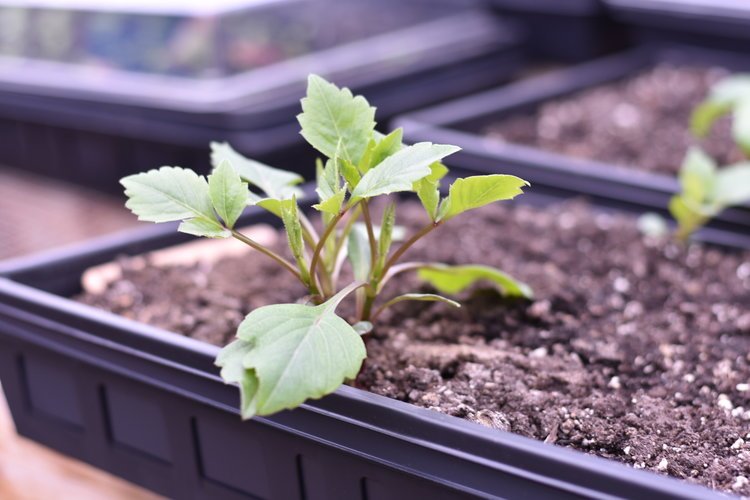
A dahlia tuber with three shoots that are ready for propagation.
For more news on the progress of these cuttings, please check back to the blog for Dahlia Cuttings: Part 2 in March!


Ready to learn more?
We have lots more to share! Learn more about the Pro Platform- where we share weekly behind the scenes video tips about our favorite plants, efficient processes, and must-have tools. Members have access to the full library, plus downloads and templates, our vendor lists, special offers, and a tool gallery.