
Drip Irrigation Basic Set up
Hello! Installing a drip irrigation system can seem overwhelming and confusing. That’s how I felt, anyways when I went to order my first one.
In order to get past the stumbling block of putting a system together, I studied the parts that would be included in a small farm kit, then I bought the pieces suggested by the kit and ordered the lengths of tubing that would be needed for my plots. To save you time and frustration, I’m going to lay out the exact parts we use here for you.
The good news is: once you put together one of these simple systems, you can do it again and again. They require no special tools or training or expertise, I promise! You just need access to a garden hose for water.
We have 6 drip zones on our farm (we’re about to add 2 new ones for watering potted dahlias and lilies) and they each water about 4,200 square feet of beds. Our beds are 4ft wide and there is about 1.5 to 2 feet between each one — the space we use as aisles.
See the video explanation here and scroll down for the text with the shopping links. Read the post to learn which variables you should consider when choosing some of the parts.
OK! Let’s set up a new DRIP system together!
Here are the parts you’ll start with, beginning with the end of your hose that feeds your field/garden. You can do this!
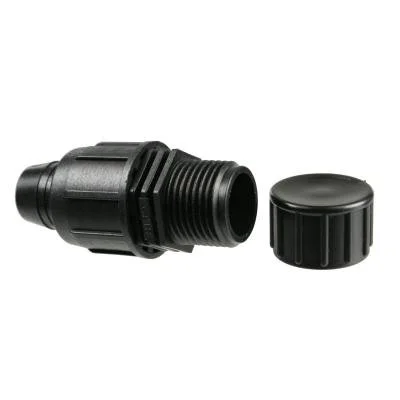
If you are drawing water from your home well or a public water supply, first add a HOSE VACUUM BREAKER. This part screws right on the end of your garden hose (3/4 inch size for US garden hoses) and it prevents soiled water or bacteria from your field drip system from accidentally being pulled back down into your potable water source. That would be yucky. You only need 1 of these parts per system.
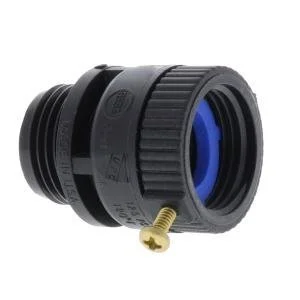
Hose Vacuum Breaker
2. Next, we attach a LOW FLOW PRESSURE REGULATOR for 15 PSI. This part helps regulate the pressure in the drip system. Choose “hose” as your thread type, NOT “pipe.” The PSI number 10, 15, 19 or 25 is related to your application. For drip tape systems like ours, choose 10 or 15. For tubing systems, you typically use a higher PSI: 19 or 25. You only need 1 of these parts per system.
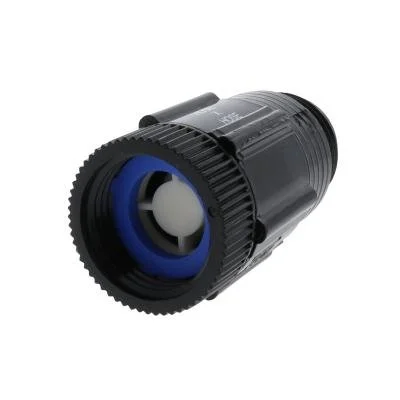
Low Flow Pressure Regulator
3. Next: attach a FEMALE HOSE SWIVEL ADAPTOR. Choose 3/4 inch as your thread size and 3/4 inch as your Perma-Loc tubing size. You only need 1 of these parts per system.
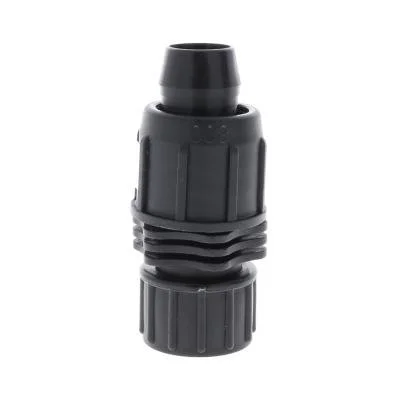
Female Hose Swivel Adaptor
Awesome! These parts just screw right into each other. Ordering the right parts is half the battle!
4. Now, link your mainline tubing. This tubing should run the width of your field. From it, all of the drip tape pieces will branch off to serve your beds. We use this POLYETHYLENE TUBING as our mainline tubing. You need to choose 3/4 inch tubing to attach properly to the part number 3 above.
Order enough (length) polyethylene tubing for the width of your bed. If you have extra you can save it and make another system later.
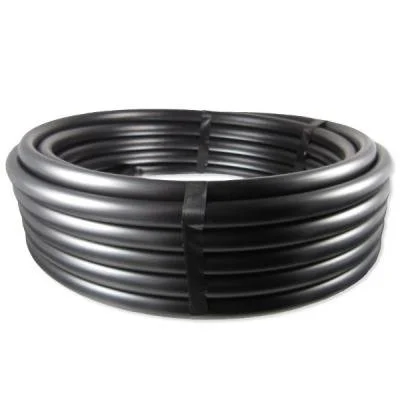
Polyethylene “mainline” tubing
5. Super! Now, at the end of your field, cut your polyethylene tubing (we just use a pair of garden pruners to cut it) and put on a TUBING END CAP. If you are replicating our system, order 3/4 inch size. You only need 1 of these per system.
Fantastic! Now you’ve got your mainline set up!
Now we can proceed to adding the drip tape for each bed. This process is easy, too!
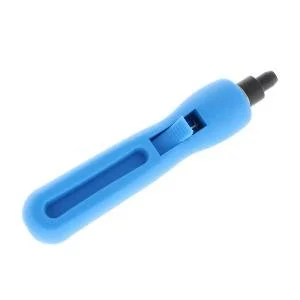
6. Use THIS TOOL to punch holes in your mainline. This is a 7mm punch. The holes will allow you to attach a valve to connect the drip tape. Don’t worry if you make a mistake! You can fill any mis-placed holes with GOOF PLUGS - no joke, they are really called goof plugs! I recommend ordering some goof plugs to have on hand in case you make a mistake or decide to move your valves for some reason.
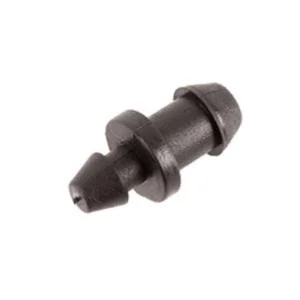
7. We have 4 ft wide beds and we generally make 4 holes in the mainline across the end of each bed. If we are making a bed with LOTS of plants or tight spacing (like 6 inch spacing in landscape fabric), we might put 5 or 6 holes. In each hole, add a valve. They just pop in. We use barb size 7mm and perma loc size 5/8 inch. Do some quick multiplication and figure out how many valves you’ll need. 4 valves for beds with 9-inch or greater plant spacing. 5 or 6 valves for beds with tighter plant spacing.

Valve
8. On each valve you’ll be adding a long piece of DRIP TAPE that extends down the length of the bed. You have a few choices when selecting drip tape. We use 5/8 inch size to match the valves mentioned above.
We recommend the thicker, 15mm wall thickness for your tape. Investing in thicker tape will save you lots of time making repairs later. And it will be less likely to kink and cause problems for water flow.
We use 8 or 12 inch emitter spacing for our heavy clay soil that retains water well. If you have sandy soil or very well draining soil, you may want to choose 4 or 6 inch emitter spacing.
We choose an emitter flow of .25 gallons per hour (slower rate of flow). You might want to use a higher rate if you have well draining soil or feel you need to water things faster. Our emitter rate works well for us. And lastly, choose a length of roll that will meet the needs of your project.
You can cut your drip tape with scissors or your garden pruners. No need to buy a special tool.
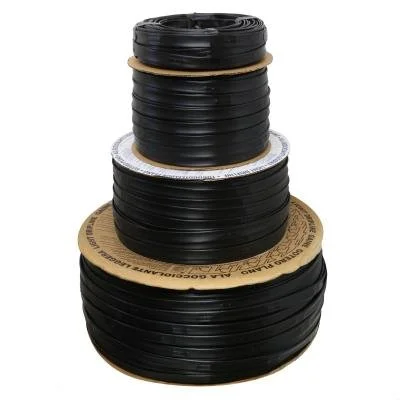
Drip Tape
9. HOT TIP: Do NOT buy end caps for your drip tape. Changes in pressure and the shrinking and expanding of your tape lines make them almost impossible to keep on. Instead, fold the end of the tape over and slip a short piece of tape over the fold. This will “cap” your end better than the parts made for the purpose. Use this method to seal off the end of each line.
HEY! That’s it! You did it! Now you have an awesome drip irrigation system and you don’t have to hand water or move sprinklers around or pray for rain.
Fixing Leaks:
What do you do when you get a leak in the line? Occasionally wear, time, or a critter may make a small hole in your tape. Don’t try to fix it with duct tape. Keep some of these TAPE COUPLERS on hand. Cut out the bad section or leaking point. Add a coupler. Good as new. Order 5/8 inch size to match the drip tape recommended in this post.
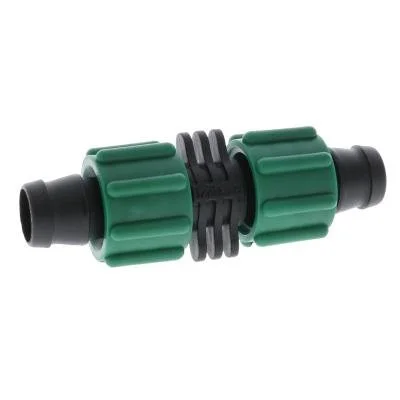
Tape Coupler
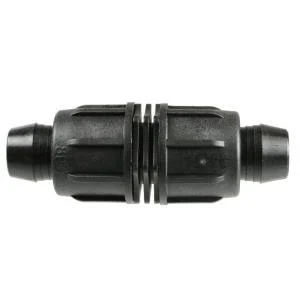
Want to connect 2 pieces of Main Line?
There is a part for that, too! Use these mainline TUBING COUPLERS for your 3/4 inch polyethylene tubing. They are helpful for making use of extra spare pieces of mainline tubing in order to make one longer piece. Or- maybe you make your field a little larger in the future and you want to expand the length of your mainline. Be sure to choose 3/4 inch size to match the other parts listed here.
That’s it for Drip Tape systems
I hope this step-by-step post was helpful. Use the links to shop— you can just add them to your Drip Depot shopping cart as you go. This company generally has great turn around time (a few business days) for supplies. They have always been easy to work with and they send Tootsie Pops with every order.
As a reminder: I’m not sponsored or paid in any form for the tools I recommend here. This this the company I’ve worked with from the beginning and I’ve never had a reason to look elsewhere.
Please share your questions in the comments below and have a look at the video to see the set up process.